Monday, December 21, 2009

Calamari, sorta kinda not really...


So I recently got my hands on Living Raw Food, the second book of recipes from the Pure Food and Wine proprietor. It did pretty much the same thing the last book did, which was reignite my interest in working with raw foods.

The appeal of raw foods wasn't so much about health (O.K. wasn't only about health) but a cross between the sort of primitive molecular gastronomy practiced by many raw foodists and the meaningful exploration of high quality ingredients. I was also taken in by the use of whole foods, given processed foods lost much of their appeal to me during that brief Atkins-diet phase I had when I was 20 or so. While I ditched the diet of waterbath cheesecake made with splenda, I never quite picked pasta and other refined starches back up.

It is recipes like the above, calamari with tartar sauce, that are reigniting my passion for exploring this cuisine. However it is also reminding me of the frustrations when dealing with the not-so-vegan-inclined..

Tess (my vegan buildingmate): "Ike, you want to come upstairs with us to get some raw vegan calamari?"
Ike (Tess's not so vegan but very blue partner): "I don't like calamari."
Tess: "Well it isn't calamari."
Ike: "I don't really like things fried."
Tess: "It is raw! How can it be fried?"
Ike: "Well, you said it was calamari."
Tess: "It is raw vegan, how can it be squid or fried?"

Ai. Ike did come upstairs. Ike ate raw vegan calamari. Raw vegan calamari was deemed good, or at least acceptable for those who don't like fried calamari.

Honestly it isn't all that much like calamari, though if you like calamari you'll probably like these. It is definitely a snackable concoction that makes for a good traveling companion, it is cute, and novel, all told pretty easy to make. Cutting them into rings is a vanity that you can surpass if you feel like it. Regardless of the differences, the inspirations you find raw foodists make from the original food is a delight.

While I'm not going to post the recipe here (see the book below, it is worth it), I'll mention that a mix of spices, ground up golden flax seeds, some lemon, and king oyster mushrooms are friends of yours... And of course, do not forget the salt.

Wednesday, October 28, 2009

Delicata Squash Cheesecake


It has been a busy couple of weeks! I have made quite a few dishes, many of which will be lost due to a lack of archiving. Thankfully I am sure every thing has left me with some imprint, and I am now at least slightly wiser... My cakes will be fluffier, cookies crispier (on the outside, with chewy tender insides), and ice creams creamier.

Chai frozen yogurt, whisky apple pie, carrot sorbet, broiled radicchio slaws, five spice spreads, dark-chocolate stout ice cream, celeriac-green apple soup are some of the casualties of this fall that may never get posted. My Community-Supported Agriculture share has tossed me some curveballs, and I have handled them with grace, rendering me a bit too busy to give my blog some well-earned love. Appropriately enough, it is with some sadness that I am not off picking up my CSA share right now, which ended last week. The winter share, with rutabagas, radishes, and leafy greens will be returning on Friday, then every other week through December.

There are always a few items I have a hard time repurposing, depending on what is going on in my life at that point. This fall it was the adorable little carnivale and delicata squashes showing up in my share. They are lovely, sweet little squashes with edible skins that deserve a good place on a plate... Not the sort of thing to be brought out for pot-lucks, which has been my usual modus-operandi when it comes to food preparation. Eventually, I ended up with several and remembered that there was a Kabocha Squash recipe I had been considering making. And below we have it!

-This is definitely a recipe in progress, changes I'm planning for next time will be marked with an asterix and my intent for the future round-

Delicata Squash Cheesecake

Walnut-Lime Crust:
  • 1/4 c (2.2 ounces) Palm Oil shortening
  • 1/2 c (2 ounces) walnuts, toasted
  • 1/2 c (2 1/2 ounces) packed light brown sugar
  • 1 1/2 c (6.2 ounces) graham cracker crumbs
  • 2 t grated lime zest (about 2 medium-small limes)
  • 1/2 t cinnamon
  • 1/4 t ground ginger
  • 1/2 t salt

Kabocha Squash Filling
  • 3 lbs of sweet fall sqaush (I used Delicata & Carnivale, Kabocha and Butternut will also work)
  • 8 oz firm silken tofu
  • 1 c (7 ounces) white sugar
  • 1 1/2 t cinnamon
  • 1/2 t freshly grated nutmeg
  • 1/2 t salt
  • 1/2 t umeboshi paste*
  • Juice of 1 medium lime*
  • 1 T soy yogurt*
  • 1/2 c arrowroot starch*
  • 1 1/2 T brandy*


1. Steam the squash, until the a knife easily pierces the flesh and the stem falls off. To do this I prepared a large pot with an inch or two of water on the bottom, and placed a steamer basket within. I put the sqauash atop the basket, and brought the water to a boil over high heat. I reduced the heat to medium, covered the pot and let the squash cook for about an hour. When it is done, remove it from the heat and let it cool. Meanwhile, I....

2. Preheated the oven to 300 to prepare the crust: Grease a 9 inch springform pan. In a food processor chop the walnuts with half of the brown sugar in a food processor, until they are coarsely ground but not turning into a flour. Transfer walnut/sugar mix to a mixing bowl with the rest of the ingredients, except for the shortening. After the dry ingredients are mixed, add the shortening and stir with a rubber spatula until everything is evenly mixed. If the mix is too dry to stick together when pressed against the edge of the bowl, add a couple of tablespoons of water as needed. When done, press into the bottom of the pan and up the sides if you have extra.

3. Put the crust in the oven and bake until it is golden brown, about 12 minutes. Remove and let cool completely. Leave the oven on.

4. When the squash is cool enough to handle, cut it in half, scoop out the seeds and scoop the flesh away from the skin. It is ok if a little skin gets in in the case of delicata and carnivales. Get 2 1/2 cups of flesh (save the rest for something else), and place the flesh into a blender bowl. Add the rest of the ingredients for the filling, and blend until well mixed and smooth (hi-power blenders are great for this!).

5. Pour the custard mixture into the springform pan and place in oven. Bake until the middle is set, with the center still slightly jiggly, about 1 hour. Cool completely, unmould, and serve!

*Next time I would use less arrowroot starch (probably 1/4 c + a T or two), less lime juice just for tartness. The yogurt and umeboshi paste are optional, I just happened to have them, though you may want to add more salt if you ditch the ume paste. and I forgot the brandy but would try to remember it next time.

The cheesecake is somewhere between a pumpkin-style pie, and a cheesecake. It is virtually fat free, tangy, and certainly interestingly flavored, if not flat-out good. It is good enough for me to seriously desire to make again.

Friday, October 2, 2009

Stewed Tomatillos & Tomatoes


You say Tomato, I say Tomatoes & Tomatillos... OK that didn't work out the way I wanted it to, but needless to say.... One of my most recent bounties has been tomatillos and tomatoes... From this I have made sauces, and even the adventurous (and delicious) tomato jelly (recipe forthcoming, probably). This dish is surprisingly not much less adventurous than the tomato jelly, with interesting sour overtones similar to those I have found in some Malaysian dishes. This likely had something to do with a tart leek stock I used, as much as the contents of the soup... If it is something you desire, I feel like some lime juice could help achieve it.

Anyway... Having recently begin a new job with a vegetarian good food fast startup, I am a bit on the exhausted side for florid posts, so I am just going to git on with the recipe... It goes well straight on its own, or with a cous cous or other grain. It can be had hot or cold.

Stewed Tomatillos & Tomatoes

2 T extra-virgin olive oil
1 large white onion, chopped
2 poblano chilis, chopped
2 cloves garlic, crushed
1 1/2 pounds tomatillos, husked and washed
1 1/2 pounds tomatoes*
1 cup home made stock or water
Salt & Pepper to taste
2 T Vodka (optional)**
2 T lime juice or white vinegar (also optional, if you like tart)

*I used mixed cherry & pear tomatoes. Large tomatoes, of any ripeness, cut into chunks will also work.
**Vodka, along with white wine, is a lovely flavour enhancer of tomato products.

Warm the oil in a large pot on a medium-high heat, when the oil heats up add the onion, pepper, and garlic until the onion is has begin to brown, about five to ten minutes.
Add the tomatillos, cook until the skins start to break open, ten to fifteen minutes. Pour in the stock and vodka, and stir, bring to a boil, then reduce the heat to produce a slow bubble and cover, cook until the tomatillos are mostly dissolved, about thirty minutes. Add some salt and pepper for flavor.
Returm the heat to medium-high. When the mixture starts to bubble, add the tomatoes. Cook, stirring occasionally, until the tomatoes wilt but their skins remain intact. Now add the sour liquids if that is what you like.
Add more salt and pepper if desired, serve hot, at room temperature, or cold, drizzled with olive oil if desired.

Monday, September 28, 2009

Tarts! (Is "Let's get reTarted" offensive?)

First, a quick note, I have some recipes being featured on Meatless Mondays! If you haven't checked that campaign out, definitely do it! Even better, pass it around to your resolutely omnivorous friends. All they ask is that you don't eat meat one day of the week, easy I know, rite?! Anyway, onto the food bits...


Pictures above is a leek and roasted red pepper tart topped with a confit of slow-dried tomatoes, on a bed of sriracha, a thai hot sauce also known as "rooster sauce," or "cock sauce." It is a fun kitchen accessory, many believe it an absolute necessity. But what are we doing talking about cock sauce, when this post is about tarts?

I wish it were about tarts! But the above tart did not dazzle the tongue's palette. Oh the things that went wrong, I can't even begin to think about! It definitely needs work and I think the platform may be a good thing to explore... so today's recipe is only going to be a base. I will surely toy with it in the future, it has the potential to be both a great platform as well as a good dish for dinner parties and pot lucks. It can also be cut up into two-bite bits and served as an appetizer.

The tofu base is creamy, with a bit of tang (from the ume plums) that one would find in a cream cheese base. It is definitely a dish that could be mistaken for a non-vegan fritatta. Oh I can't wait to explore it!

For all my talk this dish wasn't _bad_, just wasn't as awesome as I thought it could be... So here is the base, and instructions on how to explore from there... I also made this in a 8x13 inch baking sheet, but it could also be done in a 9 inch removable-bottom tart pan, or perhaps in two smaller pie pans.


DIY Quiche

Quiche/Tart crust
3/4 c all-purpose flour
3/4 c whole wheat pasty flour
1/2 t baking powder
1/2 t sea salt
1/4 c canola oil
3-5 T cold water

Filling
2 T olive oil
3 T umeboshi paste
2 pounds firm water packed tofu, drained
3/4 t sea salt
*fillings!

To make the crust: Preheat the oven to 375, with a rack in the bottom third of the oven. In the food processor, blend the flours, baking powder, and salt together. Pulse in the oil until the mixture becomes mealy. Mix in enough water to form moist clumps. Gather the dough into a ball, then flatten it into a disk. Press it into the pan you are using, going up the sides.

To make the filling: Blend the tofu, umeboshi paste, olive oil, and salt. Pour into a bowl and stir in your fillings.

Bake the quiche for 45 minutes, or until the top is golden and the filling is set.

*Fillings: Honestly, you could probably leave this plain and just have a simple sort of tart... But more excitingly, I would recommend tossing a garlic clove or two into the mix, at least... I would look through any cook book for quiches, and simply whatever they add to the egg and dairy base, you add to this.. Spices, sauteeded mushrooms, carmelized onions, artechokes, roasted red peppers, etc. To give it a nice bit of flair, a drizzle of sauce, a spoonful of topping will make a lovely difference.

Monday, September 21, 2009

Balsamic Glazed Roasted Radicchio


Radicchio is, likely, one of the most neglected objects of my CSA share. It isn't that I don't like it, or find it appealing, but rather it is something that doesn't lend itself well to my meal-prep styles... which you'd be surprised to know consists largely of putting a lot of whatever I get into a blender and mixing the hell out of it (kale + tomatoes + garlic + radishes + radish greens + basil + romaine + apple=GO).

Radicchio has long held the title for "most likely to rot in my vegetable crisper," as I never knew of what to use it for. This has always paind me, given te plant's history as a medicinal tool thanks to its quantities of intybin, which infuses the plant with its bitter character. I always felt it was limited to a fine shred in salads, something I rarely make.

Now I have learned a way of tempering that bitterness in a dish that elevates my radicchio heads into a stand-alone dish. Today's recipe is a two-prong approach, both reducing the bitterness with roasting and counterbalancing it with a sweet balsamic and brown sugar glaze. Even better, this recipe can be made in about 5 minutes.


Balsamic Glazed Roasted Radicchio

1 lb radicchio (about 4 large heads, or 2 small)
2 T olive oil
1/4 c balsamic vinegar
1 T brown Sugar
Salt & pepper

Turn your oven to it's low broil setting, and make sure a rack is at the highest point about 4 inches from the heat.
Quarter or halve (depending on head-size) the radicchio and gently remove the core, keeping the pieces whole.
Brush heads with olive oil and place on a baking sheet. Mix the balsamic and brown sugar until the sugar has dissolved.
Place the radicchio into the oven for one to two minutes, remove and brush with the glaze. I drizzle the heads with all of the glaze (I pour it into the cracks), place back in the oven until the edges begin to crisp and char, another couple of minutes.
Remove, transfer to the serving dish, sprinkle with a little salt and a few fresh grinds of pepper.
Can be served hot, or at room temperature.

Wednesday, August 26, 2009

Mocha Pudding Pops

It is hot. I like things that are cold. I also like to have recipes that utilize things like almond milk, of which I have many containers of since school got out for the summer... Tales of the aseptic-sealed bean and nut milk mass abandonment of summer, 2009 are legendary!

Anyway... getting on with it... I am gifting you with the guide to my own first foray into frozen bars... or logging my work for my own future reference. The recipe is pretty tasty, but there are things I am going to try differently. Those notes will be after the recipe for me as well as you.

Mocha Pudding Pops


  • 1/2 C sugar
  • 3 T dark unsweetened cocoa powder (not dutch processed)
  • 5 t instant espresso powder
  • 2 T all-purpose flour
  • 2 T cornstarch
  • 2 T tapioca starch
  • 1/4 t lecithin
  • 1 T coconut oil
  • 1/4 C raw almond butter
  • 2 3/4 C unsweetened almond milk
  • 1 t vanilla
  • pinch of salt

In a large saucepan whisk together the first six ingredients.

In a blender combine the almond milk, almond butter, and salt and blend until smooth.

Add about 1/4 cup of the liquid to the dry mix and whisk until smooth. Turn the stove onto medium, whisking constantly and adding the rest of the milk slowly. Add coconut oil, turn stove to medium high and switch to a rubber spatula, constantly stirring and moving the liquid that firms up on the bottom.

When the mixture comes to a boil, stir vigorously for about 2 minutes. Remove from heat. Stir for about 1 minute as it cools down, add vanilla extract. Let cool down for another 15 minutes, then pour into moulds.

You can also pour into ice cube trays, cover with saran wrap and stick in toothpicks, then freeze for about six hours. To remove from moulds, run hot water briefly over the moulds, and shimmy out.

Enjoy! They is no denying that these are indeed pudding pops.

And that is just it, they are indeed very pudding-like, even frozen. In the future I may reduce some of the starches... Also I would add the coconut butter after I kill the heat...but there you have it, I would make them again. So, cheers and happy summer! Hopefully I'll get that update on peaches in before I leave for Burning Man!

Monday, August 24, 2009

Slow-Roasted Tomatoes


Sometimes I feel like summer is cruel. It is not a rational feeling, but rather a negative one that doesn't bask in the bounty but thinks of the future absences I'll face as the days shorten. In the moment, at Farmer's Markets, in the kitchen with my fruits of the earth, I do bask in the wonderful produce this season offers; secure that this season's goods will yield to new treasures (pears and apples I can hardly wait!) . Then I look over my photos, and see what has come and passed. These tomatoes are no longer here with me, rather they have been consumed. I smile, knowing that was their purpose.. but my smile would be even bigger if I had them with me now...

So today is a way you can stretch out your tomato supplies a little longer, while amping up the flavor, through a slow roast.

Directions are simple, ingredients minimal.

Tomatoes (Cherry, grape, and/or Roma)
Olive Oil
Salt
Unpeeled Garlic
Herbs

Preheat oven to 200 degrees Fahrenheit.

Quarter or halve your tomatoes and spread out on a baking sheet lined with parchment paper. You should have some distance between your tomatoes. For my purposes, my tomatoes were closer together (they were used for a sauce). Drizzle with olive oil, a couple of cloves of garlic, and some fresh herbs (I used some thyme and oregano sprigs).


Place in the oven, and bake for about three hours. They should be shriveled, but still have a little bit of juiciness inside. Depending on the size of tomatoes, this could take more or less time. Let them cool, then pack them in a jar and cover them with olive oil.

These are good for salsas, pizza & sandwich toppings, stand alone snacks, hummus additions... They are just good. Period.

Friday, August 21, 2009

Kitchen Improv 101: Eggplant Cutlets with "Breadcrumbs"


So many eggplants! My fridge is overrun with eggplants! Actually, that isn't entirely true. My fridge is overrun with eggplants, there are a whole lot... but my statement implies there was this sudden deluge. It has actually been an accumulation of these interesting, not-always-inspiring nightshades in my house..

It isn't that I don't like eggplant, but it seems that all the good things to do with these oblong fruits-in-disguise-as-vegetables require a couple of steps. Having moved a bit further away from my friends, the casual dinners that beg use of eggplants are harder to do.

So when my fridge cleaning yielded several eggplants from more than a few CSA shares, give/take (along with a couple of zucchinis) I decided it was time to do something about it... while also slaying the beast of other items that have accumulated in my kitchen that screamed "Use me, so I stop taking up space!"

The fruits of the day (or is that aubergine?) yielded several results... moussaka, baba ghanouj, and eggplant cutlets... using up the rest of my shredded wheat patties!

Anyway, this is a great non-recipe recipe to start feeling your way around kitchen improv. So onto the non-recipe!

Eggplant Cutlets with Shredded Wheat Bread Crumbs

Eggplants
Shredded Wheat
3 cloves Garlic, chopped
Salt
Seasonings

Coating
Vegan Milk of Choice
Rice Flour

Preheat the oven to 450 degrees.
Slice the eggplants about 1/2 an inch thick.
Drizzle a baking sheet with olive oil so it is lightly covered, then sprinkle the garlic over it.
In a flat dish Mix 4 parts non-milk with 3 parts rice flour (IE 1 cup milk to 3/4 c rice flour), mix until thick.
In another flat dish crush a few shredded wheats, mix with salt and seasonings of choice (I used black pepper, sage, and tekka)

Dredge the eggplant with the liquid coating, then coat with the shredded wheat mix. Place on baking sheet. Repeat until you run out of eggplant (or space, then either start a second sheet or wait for the first sheet to be done).

Place in oven and bake for 10 minutes. After 10 minutes remove from oven, flip cutlets over, and put in for another 10 minutes.

These are crunchy, addictive, tender.. and... sigh I do like them. They can be served straight, dressed up with a simple tomato sauce, put on sandwiches... Explore thine inner chef!

Sunday, August 9, 2009

Slightly Savory Watermelon Salad


Seasons aren't the most fair entity here in the North East. For about six months a year the earth provides us with nothing, and then in June the fresh produce begins to trickle in: parsley, asparagus, lettuce, strawberries, garlic scapes... By August, the trickle becomes a torrential rainbow-like flood. We don't "just" have watermelon, there are yellow and red melons, beets in gold, and red, and stripes, tomatoes in purple, green, zebra, and so on. There are so many wonders and joys to thoroughly explore with all of your senses!

Unfortunately there is a little bit of a bottle neck in what the human body can consume in a given period of time, no less a limit on the time one has to cherish and worship this bounty in a manner it deserves. The best I can do is incorporate the wealth of my CSA.

Today's recipe is a veganized version of a pairing familiar to foodie dorks, mozzarella and watermelon. Yet, for some reason it has never quite become that popular; likely because watermelon seems to be regarded as a summer-season only produce that we wont hack nature to distribute in winter. This salad doesn't contrast the sweetness of the watermelon, rather compliments it with some slightly sweet slightly sour slightly savory flavors... The saltiness of the ume plum vinegar gives it a nice complexity, the black peppers and basil give it a little substance, and the tofu provides a fantastic textural contrast to the fleshy, juicy bursts of watermelon.

Before I go into the actual recipe, I want to give a little public service announcement on the watermelon rind. If you have the divine grace of getting your hands on an organic watermelon do NOT discard the rind. While the toughness of the green outer skin varies (the above is fairly tender and chewable, I have found solid dark green watermelons to be a little thicker in the rind), the flesh is similar to that of a cucumber. While I am sure there is no shortage of things to do with watermelon rinds, I eat them along with the sweet flesh. Pickling is something I intend to do one of these years...

Slightly Savory Watermelon Salad


1 small watermelon
1 medium bunch basil
1/2 pint of grape tomatoes
8 oz of silken or soft tofu, drained, dried
1 T umeboshi plum vinegar
Pink Himalayan sea salt
Pepper
Pistachio Oil*

Cut the melon flesh off of the rind, and cut into cubes. Halve the grape tomatoes, Chiffonade the basil. Cube the tofu. Place in a bowl. Sprinkle with vinegar, oil, a few grinds of fresh pepper and a couple of gratings from a salt stone to taste... Toss gently, trying not to break up the tofu.

Serve. I consumed with chop sticks.

Thursday, August 6, 2009

Banana Pecan Piloncillo Ice Cream


There are many joys to be found in cooking, one is the diversity of flavours you can find in different variants of the same ingredients. This recipe draws upon the not-so-familiar piloncillo sugar; an earthy brown sugar with hints of caramel. It has been around for at least 500 years and popular is popular in Oaxaca, though it is not commonly used here. Thankfully it can be easily found in many Latin American grocery stores. Like many less-refined sugars, it is not as sweet helping gift you with a creamy, yet light ice cream that plays nicely with others.

If you have not explored the bounty of sugars on they market, I would review a few guides to them.

This recipe is a veganized version from the lovely book, Baked: New Frontiers in Baking (as has many of my recent updates, some more successful than others. This one falls under "more successful").

Banana Pecan Piloncillo Ice Cream
  • 1 cinnamon stick
  • 3/4 c firmly packed, grated piloncillo*
  • 8 very ripe bananas, peeled, broken into pieces, sealed in a bag, and frozen**
  • 1/2 c cashew cream***
  • 1/2 c chopped, toasted pecans
In a small saucepan over low heat, combine 3 T water and the cinnamons stick. Simmer until fragrant, about 3 minutes. Add the piloncillo and stir until it is dissolved. Remove from the heat and let cool to room temperature.
Remove the cinnamon stick from the syrup and pour the syrup into a blender. Add the cashew cream and bananas and blend until smooth and mushy.
Pour mix into ice cream maker and freeze according to directions. When the ice cream is nearly done, add the pecans, let mix. Transfer to a freezer-safe container.
* You can also use jaggery, or brown sugar, or some other unrefined sugar. I have used a mix of dominican sugar and jaggery.
** Alton Brown has a recipe that recommends freezing the bananas in their peel, then peeling them after about 45 minutes. I have not decided this is the must-do method for me, but I am going to continue to experiment with it.
*** I used a failure of a cashew-based ice cream. You can also use this recipe here.

Wednesday, July 29, 2009

Seasonal Slaw, Featuring Chiogga Beets, Served on a Bed of Kale


Mmm... Clearly I've got an axe to grind against my self, on that whole "only posting desserts" thing... Being unable to take new pictures also seems to be doing wonders for my blog-updating. Sadly the dishes I've made today, a Ras al Hanout and Passion Fruit slaw as well as the Whole Grain Medley tossed with Tomatoes, Basil, and Mint will be lost. The fudgey brownies from a new recipe I am tooling around with are not particularly photogenic, so cheers to that?

Anyway... The camera battery charger remains unfound (!!! pain), so I will continue posting _real_ food recipes, while I cry to my self about the veganized peanut butter crispy bars unphotographed, along with the chocolate bourbon pecan pie I am making for tomorrow.

I have yet to find my "always go to" dressing recipe for slaws, but I also never buy anything to make my slaws...

Seasonal Slaw, Featuring Chiogga Beets Served on a Bed of Kale
Serves 6

Dressing
  • 1/4 c fresh lime juice
  • 2 T Olive Oil
  • 1/4 t salt (or soy sauce)
  • 1 T nut butter (optional)
Salad
  • 1 small head cabbage, shredded (red, green, combo, whatever)
  • Any combination of the following, shredded, matchsticked, thinly sliced, or finely chopped:
  • Sweet Onions or Scallions
  • Kale
  • Beets
  • Cilantro
  • Parsley
  • Carrots
  • Cucumbers
  • Squash
  • And more!

Prepare the dressing items in a bowl, mix well.
Prepare and toss together the remaining ingredients in another bowl, drizzle dressing over. Salt to taste.
It is good let it sit a few hours, or covered in the fridge over night

    Friday, July 24, 2009

    Simple Heirloom Tomato Salad


    Heirloom tomatoes are not just candy for the mouth, but candy for the eyes as well. Above is a Marvel Stripe tomato. These varieties are best used raw, in large slices. They are pretty yellow things with red bleeding upwards. Cooking them will break down their lovely visual presence. The flavor is not strong, but like all heirlooms it is there and can be coached out to your taste buds with a little bit of salt and olive oil. This is an easy, scalable recipe that works well for individuals with gardens.. Because, really, who grows tomatoes without also growing basil?

    So... a simple little first-course, salad, lunch, snack, candy-for-your-camera, whatever you want it to be...

    Simple Heirloom Tomato Salad
    Serves 2

    • 1 very large heirloom tomato, or 2 medium heirloom tomatoes
    • A couple of sprigs of fresh basil
    • Good sea salt*
    • Black Pepper
    • Extra virgin olive oil

    Step 1: Slice the tomatoes about 1/3 an inch thick, then layer with fresh basil leaves on a plate.
    Step 2: Drizzle with oil, sprinkle with a pinch of salt, give a fresh grind of pepper. Serve.


    *I used Chardonnay Smoked Fleur De Sel, as currently I am a fan of all things slightly smokey.

    Wednesday, July 22, 2009

    Signs of Summer: Heirloom Tomato Gazpacho with Seasoned Cucumbers


    I know it may be hard to believe, but I don't _just_ make desserts. I do make plenty of other food, too! Dessert just happens to be more photogenic and easy to distribute among your friends. I am making plenty of dishes today for a girly dinner party I am organizing, but sadly my camera's battery is dead and I can't seem to find the charger...

    So, I dropped by Red Fire Farm, who do my CSA, to take advantage of their pick their own options for CSA subscribers. I was absolutely crushed to find out that I got there too late, and they had ploughed over the strawberry bushes for the season. However I did come back with loads of green beans, fresh herbs, and some Iron Bound Island seaweed. Still, the strawberries were a tragedy... I picked them last year, in early July... They were so ripe that I had to use them in less than 24 hours, but the taste was unbelievable... The crown of the crop was a red wine strawberry sorbet, rhubarb had passed season so no pies.

    So... Here is a moment to remember the strawberries that I will not have this season...

    ...

    And a brilliant red recipe to celebrate the bounty the farm offered, and remember what has passed, and will come again. The tomatoes were hothouse, sadly.. But that just means this recipe is going to be even better in August.

    Heirloom Tomato Gazpacho with Seasoned Cucumbers
    Serves 6
    Gazpacho
    • 3 1/2 pounds heirloom tomatoes, cut up into large chunks*
    • 2 t sea salt**
    • 1 T extra virgin olive oil
    • 1 clove garlic, chopped
    • A few twists of black pepper
    • Juice of 1/2 a lime
    • 1 quarter of a red beet (optional, gives a lovely depth of color)
    Seasoned Cucumbers
    • 1 large cucumber, diced***
    • 1/2 c diced sweet onion
    • 1 garlic clove, minced
    • 2 T fresh minced basil or basil flowers
    • Juice of 1/2 a lime
    • 1/4 t sea salt
    • 1/2 t paprika
    • 2 T extra virgin olive oil
    • a couple of grinds of pepper
    Step 1: Soup - Toss the tomatoes with the ingredients in a large bowl and let sit for at least 30 minutes.
    Step 2: Cucumbers - Meanwhile, assemble all of the ingredients for the cucumbers and toss together.
    Step 3: Soup - Blend until creamy and smooth. Strain through a cheesecloth into your serving bowls, garnish with the seasoned cucumbers.
    Step 4: Serve. I like to drizzle the bowls with a little extra-virgin olive oil, a pinch of coarse sea salt, and a twist of fresh black pepper.


    Notes
    *Single variety is good, the sweet Brandywine works well, as does the smoky Cherokee Purple.
    ** I used a smoked salt
    *** Depending on the cucumber, you can leave it with its skin and seeds. Thicker, older ones can have rough skin that is tough to chew, and large seeds. Some smaller, young cucumbers have a tender skin and small seeds.

    Tuesday, July 14, 2009

    Apricot Kumquat Crumb Bars


    These are gratifying, tasty addictive little things that are very easy to share (though not as easy to consume your self). Totally OT but I am so clueless as to why I have writer's block when it comes to food... I have no shortage of things to say about food, and no shortage of things to type about.. But when it comes to writing about food... it just.. Sigh. Anyway. START OVER!

    These are tasty little treats you could pretend ... Oh wait, I just solved the problem... I just need to have the tasty, tasty little thing on hand to be thoughtfully chewing on as I write about them!

    Take three! These whole grainy bars are a pleasing combination of crunchy, chewy, fruity, earthy, juicy tender morsels that ... that... *takes another one*, *chomp.* The apricot-kumquat filling is sandwiched by a pleasingly textured crust that holds the filling together, bursting out with each bite and mixing with the crust. Really they are a full bodied dessert suitable after lunch, or dinner, yet substantiated with enough fruit that you can pretend they are good for you and justify them as a breakfast treat on the way to work... Just make sure to slather them with a white sugar frosting, before hand.

    *reaches for another bite... and finds out she already had the last morsel*

    WARNING. As I just found out, running out of this quirky-combo bar can result in a full bodied pout, with an extremely jutted out lip.

    These, like many desserts, were based only loosely on a recipe.. It was neither vegan, nor based on apricots and kumquats (rather, it was based on raspberries)... However, I happened to have apricots and kumquats on hand, which seemed like when combined they could echo the tart, tangy, characteristics one gets in raspberry... The apricots giving their body, the kumquats bringing out the tart flavor as well as contributing something funky on their own. As far as labor goes, not so bad. Could be less with having to prepare the apricots, but ripe apricots should fall right off their pits.

    Needless to say, enjoy. But really, I wasn't kidding about last-bite sadness.

    Apricot Kumquat Crumb Bars

    For the Crust and Crumb
    • 1 1/2 C all-purpose flour
    • 1 C firmly packed dark brown sugar (I used muscovado)
    • 1 1/4 C rolled oats
    • 3/4 t salt*
    • 3/4 t baking powder
    • 1/2 t baking soda
    • 3/4 t cinnamon
    • 1/2 c shortening, chilled and cubed
    • 1/4 c butter sub, chilled, cubed

    *closer to 1 t if using a nice mild fleur de sel or pink himalayan

    For the Apricot Kumquat filling
    • 1/2 c dark brown sugar (re: muscovado)
    • 2 T grated orange or lemon zest
    • 1 t cinnamon
    • 4 T All-purpose flour
    • 2 pounds pitted and quartered apricots
    • 1 small handful of kumquats, chopped and seeded *
    • 1/2 C lemon juice
    • 3 T coconut butter, softened and liquidy
    • 1 T water
    • 1/4 c almond extract
    • 2 T amaretto

    *I used what I had! If you like it sharper, use more, if you have sweet lovely apricots with flavor that can stand up on its own, use less.

    Directions: Pre-heat the oven to 350 degrees F. Grease a 9x13 inch glass baking pan OR line it with parchment paper, which creeps all the way up the sides (this will make removing the bars incredibly easy, when they are cooled).

    Put the crumb's dry ingredients into the food processor and pulse a few times, until just mixed. Add the fats, and pulse until loose crumbs form.

    Put aside half a cup of the crumb mixture. Pour the rest of the mix into the prepared pan and flatten it into an even layer. The crust should touch the sides of the pan but should not edge up above. Bake until golden brown, about 12-15 minutes. Transfer to wire rack and cool. Leave the oven on and prepare the apricot filling.

    TEH FILLIN'

    In a medium bowl whisk together the sugar, lemon zest, flour, and cinnamon together. Add the apricots, kumquats, liquids, and fat (re: coconut oil). Gently mix with your hands until everything is evenly coated.

    Spread the mix over the cooled crust. Sprinkle the reserves atop.

    Bake for 35-40 minutes, rotating the pan at 20 minutes. Bake until the top is golden brown and the filling is bubbling around the edges.

    Remove from the oven and let cool on a wire rack. Cut up into squares (or triangles, or diamonds) and serve. This can also be frozen, or kept in an airtight container in the fridge for a couple of days.

    Wednesday, July 8, 2009

    Peanut Butter Marbled Rocky Road Brownie bars


    Five half pence (two and a half pence?) to the first person who can guess what the above picture is of. No cheating and reading the title before hand!

    Oops, probably too late for that, isn't it? So these are tasty, decadent, rich, happy little things. Like many things the recipe I am posting isn't exactly what I did. So first I will post the recipe I originally intended to go with... And then I will have a discussion about my dance
    with these bars...


    Peanut Butter Marbled Rocky Roads

    • 2 1/4 c vegan graham cracker crumbs
    • 2 T firmly packed dark brown sugar
    • 2/3 c butter sub*
    • 15 oz semisweet chocolate, chopped
    • 1 1/2 light corn syrup
    • 1 c soyatoo cream or cashew cream**
    • 20 halved vegan marshmallows***
    • 1/2 C whole, salted peannuts****
    • 1/2 C to 1 C smooth peanut butter
    Directions:
    Preheat the oven to 300 degrees F. Grease the sides and bottom of a 9x13 inch baking pan.

    In a large bowl, stir together the graham cracker crumbs and brown sugar, then add the butter sub. Stir gently until combined. Pour and evenly distribute into the prepared baking pan, pressing down with your hands along the bottom and up the sides of the pan.

    Bake the crust for 10-15 minutes, or until the crust is golden brown. Remove the plan, let cool on a rack.

    Set up a double boiler. In the large heatproof bowl, toss the chocolate together with the corn syrup. Place over double boiler, add "cream" of choice. Cook, stirring, until everything is melted. Fold in the marshmallows and whole peanuts. Pour the mixture into the pan and spread as evenly as possible (using an off-set spatula helps).

    Now lay down horizontal 'stripes' of peanut butter on the oozy yummy top, then drag a knife up and down vertically to create a marbling effect.

    Refrigerate for at least 3 hours, or until set. Cut into triangles and serve. The bars freeze well, and will keep for about 3 days.

    Asterix!

    So my notes... I hate letting food go to waste, so a few things I did to illustrate alternative uses for things...

    So...
    *Butter sub. I used a mix of canola oil, coconut oil, and about 15% water. There was no need to use more expensive vegan butter for the task at hand.
    ** I used a failed cashew-based raw ice cream with touches of cinnamon and raisen for the cream. It had decent flavor, was good, rich, but didn't quite click right as an ice cream.
    *** I used a failed batch of vegan marshmallows and swirled it in the chocolate mix, rather than getting some vegan marshmallows. I know I've said it before and I'll say it again. I try not to get fairly narrow-use ingredients, especially if they are unnecessarily expensive.
    **** Other nuts are usable. I tossed some yummy walnuts in there!

    Thursday, July 2, 2009

    MALTED CHOCOLATE FUDGE SAUCE (with pastry creme filled banana cakes)


    Baby, this cake is simply a vessel for the lovely unblemished chocolately surface above... Full recipes for everything else will be forthcoming, but right now I am heading off to the woods for the 4th of July.

    This is a conversion of one of many recipes that really doesn't lend itself AT ALL to being vegan (y'know.. Take eggs, cream, butter.. cook, and done! Now, how to make without the eggs, cream, and butter..), so it isn't necessarily that easy to follow.

    Furthermore, I am always trying to fight back the beast that is the house's constantly growing pantry, this means if I am running out of something needed for a recipe I will scour for substitutes or often invent my own (no soy milk? water often works for smaller amounts. Larger amount? Blend some nut butter and water for the quantity needed. Ran out of walnuts? Toast some pecans). In this case, I was supposed to use all light corn syrup, but the bottle was on its last bits, so I substituted dark corn syrup for the rest.

    Then there is finally the content itself.. It is fantastic and addictive, but I feel like I could tone down the malt flavor, in doing so I will probably streamline the recipe next round. For now you are getting the raw notes of my process.

    2/3 c Almond cream (1/6 c TJs raw almond butter, 1/2 c water, blended until consistent)
    1/6 light corn syrup
    1/6 dark corn syrup
    1 T INKA
    2 T dark muscavado sugar
    2 T light brown sugar
    3 T Medium flavor malt powder (available at Brewer's emporiums, teh internets, etc.)
    1/2 t salt (used pink himalayan)
    6 oz bittersweet chocolate, chopped into pieces (Valhrona, used I. arrr!)
    2 T butter sub (in my case I used a home made one consisting of 5 t canola oil, 1 t water, and a dash of lecithin)
    1 t vanilla extract

    Blend all of the ingredients together, up unto the chocolate. Pour into a saucepan with 4 oz of the chocolate over a medium heat. Bring to a boil and stir until smooth. When the chocolate has melted, reduce the heat to maintain a simmer and stirring very slowly, cook for 5 minutes.

    Remove from the heat and stir in the butter sub, vanilla, and the rest of the chocolate.

    Enjoy, no really, it is good. Even the unedited version I wish I

    Tuesday, June 30, 2009

    Good Morning Coffee Banana Bread Muffins with Chocolate Chips


    *note* far more photogenic if you click on the image. That said, I was not having much luck making these photogenic (they look ok in person!) *end note*

    Mmmmuffins. I rarely ever express that sentiment. In my endless food snobbery I have dubbed muffins (and scones, and a few other items) the red headed step children of baking. They are comprised of the processed foods I try to avoid, rendering them entirely anutritious entities no better for you than any given dessert. Desserts, however, are often an artful playground for flavor exploration and combination, cooking technique and theory, or a decadence to bask in the pleasure of.

    Muffins and scones tend to just be.. mediocre, unmemorable entites. There are exceptions, so I hear... And perhaps I would like to add my own to them one of these days. The above are quite tasty, and leave a glorious, clean after-taste that pleasantly lingers like a dear guest.

    I do not know if I am going to post the recipe quite yet... I feel like I need to study The Muffin, and its respective concept. I feel like there is some sort of definition that my veganzied version did not quite achieve. Your own suggestions on what makes a muffin are welcome. In the meantime, the espresso/banana/chocolate combination is one from Brooklyn's "Baked" that needs not a recipe for one to explore.

    Its 4:41 AM. I think I need sleep. I do have such a back log of things to post here, though... so many recipes getting lost in rime's sands...

    Monday, June 22, 2009

    Cherry Choco DETH!!1!


    So first I'm gonna say I wanna go to Burning Man this year (Death Guild ho!). Second, I am going to keep this simple, for it is a simple recipe.

    It is really a rich, creamy torte-like mousse that is, aside from having to soak the nuts, extremely quick and easy to make. It is one of the many items that people would not believe was vegan. Even closing my eyes and thinking about it right now I can imagine falling into its softly yielding texture.

    Anyway, on to the recipe!

    Cherry Chocolate Torte

    Crust:
    • 1 Chocolate crust of choice*, pressed into a 9" springform pan

    Filling:
    • 2 C raw cashews, soaked overnight, drained
    • 1 C dark chocolate, chopped (I used some Valhrona Orange Noir and Callabaut bittersweet)
    • 1-2 C cherries, pitted (frozen work)
    • 1/2 C water
    • Pinches of salt, drops of vanilla, flecks of cinnamon, espresso shots.. whatever floats your boat.

    *I used a simple raw crust made up of 3 parts walnuts to 1 part cacao nibs, and a pinch of salt with enough coconut butter to hold it all together. Press into pan, refridgerate.

    So, this is simple. Real simple. A powerful blender helps, and may be necessary. Soak the cashews overnight. Drain. Blend down as far as you can. Add 1/4 c water and make even smoother. Add whatever flavorings you would like. Meanwhile melt the chocolate in a double boiler. When melted, add to cashew mix and blend until very smooth, adding water as needed.

    Once smooth, stir in the cherries by hand. Save a few to adorn the torte. Pour the chocolate mix into the pan and smooth out. You can drag decorative lines into the chocolate substance as well, put in the fridge to set. Should be done fairly quickly.

    You may want to layer the bottom of the springform pan with saran wrap, for ease of removal. I served this at a dinner party cut into single serving two bite pieces. It was loved by all. Babies may have been made. I may need sleep.

    Wednesday, June 17, 2009

    PREVIEW: Wedding Cake Round, THE GROOM'S CAKE!


    So... The last wedding cake was a huge success. I am timing each cake-making with my biweekly dinner parties, next up is Thursday... So for when I get more time, I will tell you more about... Cannibul Cake!

    Very long short, my friend saw the above lolcats and she said that was the one that she wanted... How could I resist? More coming soon (oh my god the recipes I have on back queue for posting).

    Monday, June 8, 2009

    Wedding Cake (part 1) !!!


    So, I was given the ultimate vegan blogger honor the other day. My friend Jenny asked me to do her wedding cake!
    WIth some talk I also convinced her to let me do most of the food for most of her wedding, as well.
    So first, congradulation are in order to Ms. Jennifer Harder Mr. John Alexander, the future Harder-Alexanders.
    The wedding is not until May 2010, but time does move by oh so very quickly and of course I need to practice, so periodically that is what I will be doing... Practicing! As if there is any reason _not_ to make cakes that you disseminate among your friends on a semi-regular basis!

    So... Round one. I believe I did find one good lavender lemon cake for one layer. I will also likely do a chocolate layer, as well as a diabetes-friendly Groom's carrot cake.

    An added bonus of this cake was that it was served to a friend of mine who has a nightshade allergy. The powdered vegan egg replacers tend to contain potato starch in them, while this recipe used no such agents.

    So, onto the recipe...

    Lavender-infused Lemon Layer Cake

    P1040136

    2 1/2 C Pastry or Cake flour
    1 1/2 C sugar
    2 tsp baking powder
    1/2 tsp baking soda
    3/4 tsp salt
    1/4 C plus 2 T butter sub
    2 T fresh lemon juice
    1 C + 1 T water
    grated zest of 1 large organic lemon
    3/4 C soy or rice milk
    1 and 1/2 tsp vanilla
    1 tsp lemon extract
    2 t dried lavender blossoms

    Bring the water to a boil, cut the heat, add the lavender. Let cool. Strain and set aside. Discard the lavender blooms (or make more tea with em!)

    Preheat the oven to 350 degrees.
    Prepare two 9 inch round cake pans by covering them with a thin layer of shorteing then dusting them with flour, tapping off any extra flour.

    Mix the dry ingredients together and stir well.

    Mix together the wet ingredients and the lemon zest. I cut the butter-sub in with a blender, but to each their own. Pour the wet ingredients into a mixing bowl. From there I sift the dry ingredients into the wet ingredients and stir just until consistent, about one minute.

    Pour evenly into the pans, and set in the oven. Bake for 25 minutes or until done (a toothpick or fork inserted in comes out without batter sticking to it).

    Remove from oven, let cool for a couple of minutes, run a knife around the edges, and invert onto a cooling rack.

    Next up.. The curd.

    1/2 C lemon juice
    1/4 C water
    3/4 C sugar
    2 T cornstarch
    1/8 tsp salt
    grated zest of 1 organic lemon
    3 T. full fat soymilk, nut milk, or organic nondairy creamer
    1 T Butter Sub (I used coconut butter here)

    In a blender, mix together the juice, water, sugar, cornstarch and salt. Pour into a heavy saucepan with the zest. Whisk over medium heat, stirring constantly, until it comes to a full boil. Boil 1 minute, not stirring. It should be thickened and turning clear. Remove from heat. Add milk choice or alternate and butter choice. Blend well with the whisk. Cool the curd, then refrigerate in a covered container. It thickens as it cools.

    When everything is cooled, well... Do assemble as you would any layer cake, with the curd in the middle. I suddenly lost my attention to detail so will hopefully post proper assembly instructions later.

    Tuesday, June 2, 2009

    Dominos - Luxury Brownies and (Coconut) Milk Fudge


    I seem to have a chocolate and vanilla thing going on... It is late, sleep soon, the recipes always need tooling, but this is what I did, and I still ended up with a tasty end product.. Both products are best served chilled, particularly the fudge... I am not sure if I made an error in the confectionary process, or the veganized recipe needs tooling (or both). Ah to the recipes.

    Coconut Milk White Fudge with Nuts

    4 cups sugar
    2 cups coconut milk (I used a 14 oz can plus 2 T water)
    1 stick cinnamon, preferably Mexican canela
    1⁄2 cup light corn syrup
    1⁄4 tsp. baking soda
    1⁄4 tsp. fine salt
    8 tbsp. unsalted butter
    2 tsp. vanilla extract
    1⁄2 cup chopped toasted pecans
    1⁄2 cup chopped toasted walnuts
    1⁄2 cup chopped toasted pine nuts

    1. In an 8-qt. pot, whisk together sugar, milk, cinnamon, corn syrup, baking soda, and salt. Bring to a simmer over medium-high heat; do not stir the milk. Use a metal spoon to skim off and discard any foam or solids that rise to the surface, rinsing the spoon in water after each use. Simmer, brushing the sides of the pot occasionally with water to prevent the sugar from crystallizing, until the mixture thickens and a candy thermometer reads 240°, about 30–35 minutes.
    2. Remove pot from heat. Add butter and vanilla; do not stir. Remove and discard cinnamon. Let mixture cool to 180°.
    3. Grease an 8" x 8" baking pan; line bottom with greased parchment paper. Stir milk–sugar mixture with wooden spoon until no longer glossy, 5 minutes. Add pecans, walnuts, and pine nuts; stir to combine. Transfer to baking pan; smooth surface with a rubber spatula. Chill until set, about 8 hours. Turn fudge out onto a cutting board and cut into sixty-four 1" squares.

    The brownies... I have been seeking a good, dense, fudgey low flour vegan brownie recipe... the kind you get for flourless chocolate brownies. Sadly I have yet to find something that can lend the structural integrity necessary needed for flourless chocolate brownies, and the rest turn out cakey... My efforts at flourless brownies with vegan egg replacers thus far have been fairly tasty but utter failures as far as brownies are concerned. Then I saw this recipe from Coco&Me which looked promising... a low flour brownie, and my veganized effort showed it had enough flour to lend structure but not enough to dillute the quality chocolate used... The butter was replaced with a blend of water, oil, and lecitin, the eggs were replaced with Bob's Red Mill egg replacer. The final recipe could still use some work, but getting closer and leagues better than the flourless varities.

    oh man, I need to sleep... More recipes and concepts coming soon.

    Friday, May 29, 2009

    Updates, updates

    Yes I have been working in the kitchen.. Updates should be coming soon soon. Remember if you want previews, do keep up with my Flickr blog :)

    http://www.flickr.com/photos/63114167@N00/

    <3

    -Mary

    Tuesday, May 5, 2009

    Three Decadences - Donut Trifle with Rich Chocolate Pudding


    So I want to have fun, lots and lots of fun. I also want to use the knowledge I have to build to new heights. I read about the creations at P*ONG, Per Se, Citizen Cake, etc. and I want to have them, but I also want to make something I could stealthily slip among their fun, whimsical offerings without disappointing the palette. This is a noble first step... it needs work, but it is a good first step. The pudding I used for this is also a fantastic stand-alone item, if you need a spiced pudding...

    Anyway, this is an odd, fun recipe. You can make these in individual dishes, one larger dish, martini glasses, plates, whatever you have. Improvise!

    3 Strawberry Jelly Filled Donuts
    3 Devil's Foodcake Donuts

    I left them in the dehydrator overnight, at about 110 degrees or so. You don't have to do this but for me I love the crunchiness and flavor concentration it creates. When they are good and dry, break up the chocolate donuts into fair sized chunks (about eight to twelve pieces per donut). Cut the jelly donuts into quarters, set aside a couple of pieces of the jellies for top-decorations.

    Now that that is done, onto the...

    Chocolate Pudding (!!!)
    14 oz can coconut milk
    1/2 c water
    3 T sugar
    4.5 oz good dark chocolate, finely chopped (I used Valhrona and Callebeut)
    3 T dutch-processed cocoa powder (I used Sharffen-Berger)
    1/4 C Arrowroot starch
    1/4 t salt
    1 t vanilla
    1 t curry powder or spices of choice (I used a bit of freshly ground ginger, vietnamese cinnamon, madras curry powder, chili powder, anise, and nutmeg).

    Mix the coconut milk and water together, set aside 1/2 c of this mix. Put the rest of the coconut milk in a sauce pan. Add the sugar and salt. Bring to a simmer over low heat.
    Meanwhile whisk together the remaining coconut milk, arrowroot starch, spice blend, and cocoa powder until smooth (I used a blender for this). When the milk-mix has started simmering, take about 1/4 cup to the starch-milk mix and add slowly, stirring all the while until consistent.
    Turn the heat down to the lowest setting, and slowly whisk in the starch mix into the simmering liquid. Now whisk the mixture vigorously until the pudding returns to a simmer and thickens up a bit. Remove the saucepan from the heat, keep whisking for another minute. Add the chocolate and vanilla and whisk until smooth.

    At this point you can either use the hot, thick mixture to arrange the trifles, or you can put it in a dish and let it cool then arrange your trifles. It comes down to how you want to do it. Given I made my dessert in a dish for people to serve their selves out of, I chose to pour it on hot, rather than letting it set.

    The object in the photo is adorned with vegan whipped cream, shaved chocolate, and a marashino cherry. Fresh strawberries would also be a fantastic adornment.

    Monday, May 4, 2009

    Red is Stop. Green is Go. Pink is Yum.


    Waugh firefox crash just sucked my post into a void :(
    Needless to say, I have a serious problem.
    Pictured above is a sorbet, an ice cream, and a frozen yogurt. Not pictured is another four or five ice creams, another sorbet, and well.. probably some other stuff, too. My fridge is full of ice creams... FULL! Well, onto the recipes...

    Red Wine Strawberry Sorbet with Black Pepper
    • 2 pounds strawberries, hulled and washed
    • 1/4 c fresh lemon juice
    • 1 c dry red wine
    • 2 c sugar
    • 1 T vanilla paste
    • 1/2 fresh ground black pepper
    • 1 t balsamic
    • 1/2 t citric acid (if strawberries are out of season, or to taste)
    Toss strawberries with lemon juice, balsamic, vanilla, and citric acid, set aside. Meanwhile put wine, sugar, and black pepper on the stove. Warm over medium heat until sugar is dissolved. Pour syrup over strawberries, stir, let cool to room temperature then refrigerate until chilled.
    Puree or blend strawberries until smooth, then prepare according to ice cream manufacturer's instructions.


    Thai Basil Coconut Ice Cream
    **Under Construction!**: Re: I didn't log it, and it needs work anyway... I want to say I based it off of this recipe from Kitchen Therapy but looking at the recipe to say I based them off one another is a very very loose interpretation...

    Strawberry Frozen Yogurt
    • 1 pound plus 2 oz fresh strawberries, hulled and washed
    • 2/3 c sugar
    • 2 C strained plain vegan soy yogurt
    • 1 T agave
    • 1 t lemon zest
    • 2 T red wine
    • 1 t balsamic vinegar
    • 1 t vanilla extract
    • 1/2 t citric acid
    • pinch salt
    • dash lecithin
    OK I should say straight up, pretty much every ingredient after the yogurt is semi-optional, if you don't have it, don't stress it. Don't have open red wine? Use kirsh, or vodka, or rum, or nothing, or whatever. And so on... HAVE FUN! Anyway, that said, dice the strawberries, toss them with the sugar and liquor. Let sit for 2 hours.
    When two hours have passed, blend with the rest of the ingredients, chill in refrigerator. When chilled, prepare according to manufacturer's directions.

    I am going to say that the posted recipes are 'sketches.' These are rough guidelines I followed in the kitchen. I often find recipes restrictive and when it comes to flavouring, I explore with abandon. Not having some things listed rarely stops me from making something. In the case of the strawberry sorbet, rather than opening a bottle of red wine I used 1 C of a red wine black pepper sorbet I had left over, which was very dry without much sugar. In that red wine sorbet I used some leftover concord grape sorbet. I am constantly using things as much to get rid of them as I am to explore and experiment. I do advise you to do the same, though admit my boldness may be bolstered by my compression-based ice cream maker that does not need recuperation time to make a second batch...

    Remember, failure is just an excuse to cook even more, and if you are sticking to the sort of ingredients life happened to hand to you it isn't like you invested any money in the recipe... Speaking of things being handed to you, next up is going to be the Brown Sugar Ice Cream with Dark Chocolate Covered Graham Crackers...

    Tuesday, April 28, 2009

    Mega-Sandwiches. Recipe liberation

    P1030584
    I swear that this blog has become a recepticle for me to show off my unhealthy drive to make decadent desserts, and be illiterative. Still, I DO make actual food, like, food you can eat three to five times a day... Sometimes. I feel like I should make a confession here. I am a really really weird eater, or a scavenger, or a weird scavenger eater? I obsessively, impulsively have to try a taste of every thing available. It is a horrble trait i really need to conquer but ohmygoditssohard! So when it comes to cooking I go for quick gratification, or concoctions based on what I have lying around... which is often rather obscure or not at all measured. Withered ginger, the scrapings from a near-empty jar of red curry paste, salvagable scallions. half a zucchini... yeah I can work with that, but doesn't make for a great or photogenic recipe.

    Desserts fit really well into my lifestyle because no one turns down a piece of cake, a brownie, or even a scoop of ice cream. I can make them, and disperse it at a leisurely rate over the next several days. Real food, however... is not quite so easy or fun to hand out like say, prescription drugs at an end-of-year college party (is that off-colour?). Sometimes, however, I get inspired, or the leftovers I have lying around line up just right... So I present you with a more asthetically-appealing fridge and pantry cleaner... Actually, this is going to be a poor recipe, because well.. it was a pantry cleaner, so I'm giving estimates, and if you don't have it, you'll have to improvise...


    Spicy Fennel Seitan Sausage Muffaletta


    1 8-10" round olive loaf, cut into three layers

    Varying volumes of spicy faux meat (depends on how thick you like it, oh thats what she said)*

    1/2 cherry or grape tomatoes
    1/2 c olives
    2 T garlic
    1 Shallot, peeled, coarsely chopped
    Pepper
    Salt
    Olive oil

    2-4 C baby spinach (or chopped regular)
    2 T Brown Rice vinegar
    2 Medium Tomatoes, thinly sliced
    Roasted red peppers (or in my pantry-cleaning case, I used a roasted red pepper and carmelized onion relish)

    *I used a home made spicy fennel seitan sausage that I have not yet gotten a consistent recipe for, will back link it to this post when I do have it. Millenium's cookbook has a good recipe here.

    Toss the spinach with brown rice vinegar, let sit.
    In a food processor place the cherry tomatoes, olives, garlic, shallots, and salt/pepper in to taste. Give a glug or two of olive oil. Pulse until it reaches a consistency you like (I enjoy coarsely chopped, but you can make more of a paste).

    Thinly slice the "meat," and spread on the bottom slice of the bread. Top with a layer of the tomato-olive relish. Top with half of the spinach, place on baking sheet. On the middle slice of the bread, place a layer of tomatoes, then sausage, then roasted red peppers. Top with remainder of spinach.

    OPTIONAL: Place sandwiches under low broiler to wilt spinach (yum).

    OK I need to stop procrastinating... Sandwich is pictured with a simple mixed greens and low fat sorta-not-UNhealthy chocolate cookie.

    Saturday, April 25, 2009

    monster


    monster
    Originally uploaded by vapidchick
    Coming up, spicy sausage muffaletta... assuming I survive.

    Monday, April 20, 2009

    Lazy Blogday - Twofers Unrelated - Sunbutter Cookies n' Cream, and Chocolate Mousse Pie


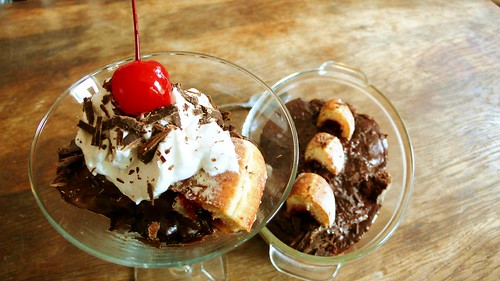
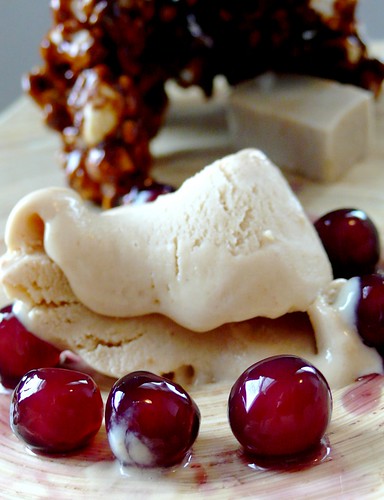
    These desserts really do not have a whole lot in common, and both stand up well enough on their own to not have to be sharing a plate... The pie in particular, at least if you get a bite with the crust. I have never had a pie in which the content was so meaningfully enhanced by the crust; in this case a mocha-walnut concoction. The airy filling is grounded in harmony the earthy base.

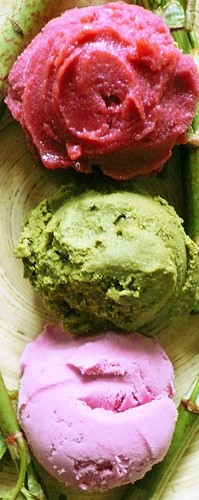
    The sunbutter ice cream, I am not so kind toward. It is delicious and addictive, but also hard and flaky if not allowed to warm up a little, first. I will probably be making it again, and try some new spins on it... Texture aside, at the end of the day its life in my freezer will not be long. Still, if I want something more solid I will be going to my other peanut butter ice cream recipe.

    My photographic laziness aside, there is a reason these two gems (one may be a little rougher, but) share a plate. They both offer special considerations toward the sensitive and the allergy-prone. The pie contains no gluten (or dairy ;) ), and the ice cream was made with a peanut-butter allergic friend in mine. So for those times when you don't want to make someone feel like everyone else is eating less well because of their needs, these dishes could please any palette.


    Sins for Saints Chocolate Mousse Pie

    So this came about because I wanted to make something for the massage workshop I was partaking in over the weekend. I was not feeling amazingly inspired the night before the event, though. So I just figured "meh," and went to bed later than I should have. I woke up, still wanting to make something, and fingered through a cookbook for an idea and saw a mousse. When I first experimented with vegan cooking, a tofu-based strawberry-kiwi chocolate pudding was one of my first recipes... so I ran some math in my head and this is what I got.

    It was 7:50 AM. My workshop was at 9. Travel time was half an hour. Time was of the essence, so oven baking was out of the question. I wanted to do an oreo cookie crust, but with only 6 cookies that wasn't happening. So instead the crust was inspired by my experience with raw desserts. It was a total win, even better one of the girls of the group is gluten-intolerant, which I had forgotten. And the mousse.. well.. its just good... The food-making part was done within 25 minutes, and while I could have left the kitchen cleaner, I certainly could have left it worse. I was amazingly happy with it (so was everyone else). Though I am going to say it is absolutely necessary to make sure to get a bit of crust with each bite of mousse. Knowing that, So, onto the tart.

    Crust:
    1 and 3/4 c walnuts*
    1/4 c cocoa powder**
    1/2 t sea salt
    2 T maple syrup
    1-2 T raw coconut butter
    1 t ground coffee

    Mousse
    15 oz dark chocolate, chopped***
    1 c plus 2 T soy milk
    1 T cocoa powder**
    3/4 t kuzu starch
    20 oz silken tofu
    1/4 c maple syrup
    2 t vanilla paste (or extract)
    1/2 t almond extract

    1. To make the crust, place walnuts in a food processor and chop until they are fine crumbs. Add everything else except the coconut oil and mix well. Add enough coconut oil for the crust to stick together. Press into 10" spring form pan and place in fridge to set.

    2. To prepare the mousse filling dissolve the kuzu in the 2 T of soymilk. While it dissolves, place the chocolate, cocoa powder, and 1 C of soy milk in a double boiler. Add the dissolved kuzu starch and heat over simmering water, in the double boiler, until melted, stirring occasionally. It should take about 15-20 minutes.

    3. Meanwhile, place the tofu in a blender bowl or food processor and blend until smooth. Add maple syrup, vanilla, and almond extract and blend again. Either blend with chocolate mixture, or fold in.

    4. Pour the chocolate mixture into the springform pan, and chill until set (about 2 hours), or overnight, before serving.

    *I used soaked and dehydrated but that is up to you
    **Valhrona
    ***I used a blend of Trader Joes Dark Pound Plus and Callebeut Semisweet

    NEXT!

    Sunbutter Ice Cream

    9 oz silken tofu
    1 c water
    1 c soy milk
    1 c sunbutter
    1/4 c sugar
    1/2 t salt
    1 t vanilla
    1 T powdered maca (Optional. I like the malty flavor it imparts)
    15-20 (or more!) Chocolate Sandwich cookies (I used Joe-O's), broken up just a lil'.

    Bring the water to a boil, add sugar and let cook for 5 minutes. Let cool. Blend remaining ingredients (except for the cookies) until smooth. Chill and prepare according to the directions of your ice cream maker. Once mixed, add in the cookies and either stir in by hand or churn until they are just mixed. Pack into container and enjoy now, or later, or now and later.

    Wednesday, March 25, 2009

    Mango-Tequila Sorbet spiked with Serrano Chilis


    P1030390
    Originally uploaded by vapidchick
    So a friend told me about a spicy mango sorbet he had at a local Ice Creamery... And well... me being the cocky cocky cook that I am thought "Anything they can do I can do better."
    There are many reasons I don't really like eating out, that extend beyond my vegan values... and that mantra is one of them.

    While I have never eaten this purveyor's spicy mango sorbet, I have no shortage of affection for this one. On the spiciness factor, all but one friend was fine with it. The latter claimed that I assaulted her with it and made her eat it, "but the cilantro one was really good." I know that after a few bites I am I need a glass of (almond) milk.

    Onto the recipe!

    Mango-Tequila Sorbet spiked with Serrano Chilis

    1 Umeboshi plum (Eden)
    32 oz Frozen mango chunks (Trader Joes/365 Organic)
    1 pinch salt (Pink Himalayan)
    1 cup water
    1 cup sugar
    1 T jaggery (Thai taste)
    3 T tequila (Salza brand, Hornitos)
    2 T lime juice or to taste
    3 Serrano chillis, seeded (or more, depending on preferred spiciness)
    1 T raw almond butter (maranatha)

    Make a simple syrup with the water and sugar (bring to a boil in a sauce pan, for a few minutes, then let return to room temperature)

    BLEND ALL!

    Chill. Churn according to ice cream machine's instructions...

    Substitute sugar mix with an agave/water blend (sweetened as you like) to make raw.

    Also I recommend checking out the up close close full size photo here..

    Tis pretty :)

    Coming up were the accompanying sorbets... a Cilantro-Rum Lime Sorbet, and a savoury Roasted Red Pepper and Chipolte ice cream.

    Tuesday, March 24, 2009

    Winter Kept Us Warm...


    One of my favourite food items has to be the simplest of simples; brown rice porridge. This dish is a staple in Asian kitchens, where it is known as jook, or congee. It can be jazzed up with tofu, slivers of ginger, vegetable stock, cinnamon, nut butter, coconut milk, vanilla, toasted nuts... the sky is the limit. I have been there, done that, but nothing will ever compare to straight up cooked brown rice, reheated with water until it becomes a creamy porridge.

    This winter I finally swung myself a dedicated morning yoga partner, and every morning after yoga we would sit down to a bowl of brown rice porridge with a cup of genmaicha (roasted brown rice tea). After yoga, if you told me that I could only have this to eat for the rest of my life, and that would be it, I would be happy. Any type of rice works, brown, or white, short grain, long grain, basmati, jasmine, etc. Better than that, you can do this with any leftover grain... millet, buckwheat, quinoa, etc. However, brown rice has my heart. I am not keen on quinoa... it never breaks down into creamy goodness.

    The directions are simple... put as much (or as little) leftover cooked rice or other grain into a heavy bottomed bot, and cover with a half-inch of water. Cook until it is the consistency that you desire. I like my congee to really be pudding-like, others prefer it where the rice has maintained its shape.

    I often add nothing, just a little salt. Today, in the name of using them up, I tossed in some of the tapioaca 'grapes' leftover from the recipe I am in the middle of illuminating... and here is another close up of those funballs, for the heck of it..

    Speaking of simple pleasures... A piece on shared experiences making us happier than material acquisition... And here is where I note that I have never sat down and had this centering dish by my lonesome.

    Tuesday, March 17, 2009

    Malted Peanut Butter Ice Cream


    OK, so maybe the pictures were not as bad as the first one implied... Though this one could use some serious photoshop mopping on my lovely concord grape balls, as well as the plate. Oh well, I'm working on it, I'm working on it.

    Appropriately enough, better pictures come with better recipes (Srsly? You mean it gets better than salted concord grape tapioca balls?!) So I am starting to release the more substantial stand-alone items of this concoction. The first, and probably best to make without any grander purpose is the peanut butter ice cream. Sure, the melting ice cream does go beautifully with the crunchy home made cracker jacks, tangy sesame yogurt cubes, and salty-sweet-chewy tapioca balls, but I don't just whip those out of the cupboard.

    Anyway, this was sourced from a number of peanut butter ice cream recipes, and I gave it my own twist... I felt it turned out quite lovely, but it turned out even better when paired with a dark chocolate ice cream, recipe forthcoming... I am going to note I used a super blender for this, so you may want to stick to very smooth peanut butters if using a normal blender. The addition of maca root can be omitted, rendering the peanut butter non-malted. I felt it was missing something, though, which is why I added it. I am sure the type of peanut butter one is using can significantly change this, though.

    Malted Peanut Butter Ice Cream

    1 12 oz package silken tofu, frozen, thawed then drained
    1 cup peanut butter (I used a mix of ground-at-store, Maranatha, and Trader Joe's Valencia)
    3/4 c maple syrup (think I used grade A, Kirkland brand)
    dash cinnamon
    1/4 t Xanthum Gum
    1 T gelatinized maca root powder
    1 3/4 C unflavored hemp milk (or milk alternative of choice)

    Blend ingredients together.
    Chill.
    Churn.
    Chow.