Wednesday, July 29, 2009

Seasonal Slaw, Featuring Chiogga Beets, Served on a Bed of Kale


Mmm... Clearly I've got an axe to grind against my self, on that whole "only posting desserts" thing... Being unable to take new pictures also seems to be doing wonders for my blog-updating. Sadly the dishes I've made today, a Ras al Hanout and Passion Fruit slaw as well as the Whole Grain Medley tossed with Tomatoes, Basil, and Mint will be lost. The fudgey brownies from a new recipe I am tooling around with are not particularly photogenic, so cheers to that?

Anyway... The camera battery charger remains unfound (!!! pain), so I will continue posting _real_ food recipes, while I cry to my self about the veganized peanut butter crispy bars unphotographed, along with the chocolate bourbon pecan pie I am making for tomorrow.

I have yet to find my "always go to" dressing recipe for slaws, but I also never buy anything to make my slaws...

Seasonal Slaw, Featuring Chiogga Beets Served on a Bed of Kale
Serves 6

Dressing
  • 1/4 c fresh lime juice
  • 2 T Olive Oil
  • 1/4 t salt (or soy sauce)
  • 1 T nut butter (optional)
Salad
  • 1 small head cabbage, shredded (red, green, combo, whatever)
  • Any combination of the following, shredded, matchsticked, thinly sliced, or finely chopped:
  • Sweet Onions or Scallions
  • Kale
  • Beets
  • Cilantro
  • Parsley
  • Carrots
  • Cucumbers
  • Squash
  • And more!

Prepare the dressing items in a bowl, mix well.
Prepare and toss together the remaining ingredients in another bowl, drizzle dressing over. Salt to taste.
It is good let it sit a few hours, or covered in the fridge over night

    Friday, July 24, 2009

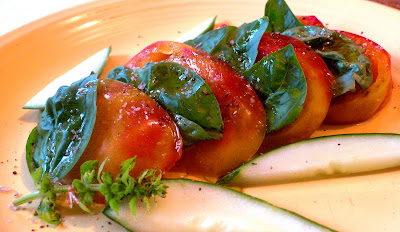
    Simple Heirloom Tomato Salad


    Heirloom tomatoes are not just candy for the mouth, but candy for the eyes as well. Above is a Marvel Stripe tomato. These varieties are best used raw, in large slices. They are pretty yellow things with red bleeding upwards. Cooking them will break down their lovely visual presence. The flavor is not strong, but like all heirlooms it is there and can be coached out to your taste buds with a little bit of salt and olive oil. This is an easy, scalable recipe that works well for individuals with gardens.. Because, really, who grows tomatoes without also growing basil?

    So... a simple little first-course, salad, lunch, snack, candy-for-your-camera, whatever you want it to be...

    Simple Heirloom Tomato Salad
    Serves 2

    • 1 very large heirloom tomato, or 2 medium heirloom tomatoes
    • A couple of sprigs of fresh basil
    • Good sea salt*
    • Black Pepper
    • Extra virgin olive oil

    Step 1: Slice the tomatoes about 1/3 an inch thick, then layer with fresh basil leaves on a plate.
    Step 2: Drizzle with oil, sprinkle with a pinch of salt, give a fresh grind of pepper. Serve.


    *I used Chardonnay Smoked Fleur De Sel, as currently I am a fan of all things slightly smokey.

    Wednesday, July 22, 2009

    Signs of Summer: Heirloom Tomato Gazpacho with Seasoned Cucumbers


    I know it may be hard to believe, but I don't _just_ make desserts. I do make plenty of other food, too! Dessert just happens to be more photogenic and easy to distribute among your friends. I am making plenty of dishes today for a girly dinner party I am organizing, but sadly my camera's battery is dead and I can't seem to find the charger...

    So, I dropped by Red Fire Farm, who do my CSA, to take advantage of their pick their own options for CSA subscribers. I was absolutely crushed to find out that I got there too late, and they had ploughed over the strawberry bushes for the season. However I did come back with loads of green beans, fresh herbs, and some Iron Bound Island seaweed. Still, the strawberries were a tragedy... I picked them last year, in early July... They were so ripe that I had to use them in less than 24 hours, but the taste was unbelievable... The crown of the crop was a red wine strawberry sorbet, rhubarb had passed season so no pies.

    So... Here is a moment to remember the strawberries that I will not have this season...

    ...

    And a brilliant red recipe to celebrate the bounty the farm offered, and remember what has passed, and will come again. The tomatoes were hothouse, sadly.. But that just means this recipe is going to be even better in August.

    Heirloom Tomato Gazpacho with Seasoned Cucumbers
    Serves 6
    Gazpacho
    • 3 1/2 pounds heirloom tomatoes, cut up into large chunks*
    • 2 t sea salt**
    • 1 T extra virgin olive oil
    • 1 clove garlic, chopped
    • A few twists of black pepper
    • Juice of 1/2 a lime
    • 1 quarter of a red beet (optional, gives a lovely depth of color)
    Seasoned Cucumbers
    • 1 large cucumber, diced***
    • 1/2 c diced sweet onion
    • 1 garlic clove, minced
    • 2 T fresh minced basil or basil flowers
    • Juice of 1/2 a lime
    • 1/4 t sea salt
    • 1/2 t paprika
    • 2 T extra virgin olive oil
    • a couple of grinds of pepper
    Step 1: Soup - Toss the tomatoes with the ingredients in a large bowl and let sit for at least 30 minutes.
    Step 2: Cucumbers - Meanwhile, assemble all of the ingredients for the cucumbers and toss together.
    Step 3: Soup - Blend until creamy and smooth. Strain through a cheesecloth into your serving bowls, garnish with the seasoned cucumbers.
    Step 4: Serve. I like to drizzle the bowls with a little extra-virgin olive oil, a pinch of coarse sea salt, and a twist of fresh black pepper.


    Notes
    *Single variety is good, the sweet Brandywine works well, as does the smoky Cherokee Purple.
    ** I used a smoked salt
    *** Depending on the cucumber, you can leave it with its skin and seeds. Thicker, older ones can have rough skin that is tough to chew, and large seeds. Some smaller, young cucumbers have a tender skin and small seeds.

    Tuesday, July 14, 2009

    Apricot Kumquat Crumb Bars


    These are gratifying, tasty addictive little things that are very easy to share (though not as easy to consume your self). Totally OT but I am so clueless as to why I have writer's block when it comes to food... I have no shortage of things to say about food, and no shortage of things to type about.. But when it comes to writing about food... it just.. Sigh. Anyway. START OVER!

    These are tasty little treats you could pretend ... Oh wait, I just solved the problem... I just need to have the tasty, tasty little thing on hand to be thoughtfully chewing on as I write about them!

    Take three! These whole grainy bars are a pleasing combination of crunchy, chewy, fruity, earthy, juicy tender morsels that ... that... *takes another one*, *chomp.* The apricot-kumquat filling is sandwiched by a pleasingly textured crust that holds the filling together, bursting out with each bite and mixing with the crust. Really they are a full bodied dessert suitable after lunch, or dinner, yet substantiated with enough fruit that you can pretend they are good for you and justify them as a breakfast treat on the way to work... Just make sure to slather them with a white sugar frosting, before hand.

    *reaches for another bite... and finds out she already had the last morsel*

    WARNING. As I just found out, running out of this quirky-combo bar can result in a full bodied pout, with an extremely jutted out lip.

    These, like many desserts, were based only loosely on a recipe.. It was neither vegan, nor based on apricots and kumquats (rather, it was based on raspberries)... However, I happened to have apricots and kumquats on hand, which seemed like when combined they could echo the tart, tangy, characteristics one gets in raspberry... The apricots giving their body, the kumquats bringing out the tart flavor as well as contributing something funky on their own. As far as labor goes, not so bad. Could be less with having to prepare the apricots, but ripe apricots should fall right off their pits.

    Needless to say, enjoy. But really, I wasn't kidding about last-bite sadness.

    Apricot Kumquat Crumb Bars

    For the Crust and Crumb
    • 1 1/2 C all-purpose flour
    • 1 C firmly packed dark brown sugar (I used muscovado)
    • 1 1/4 C rolled oats
    • 3/4 t salt*
    • 3/4 t baking powder
    • 1/2 t baking soda
    • 3/4 t cinnamon
    • 1/2 c shortening, chilled and cubed
    • 1/4 c butter sub, chilled, cubed

    *closer to 1 t if using a nice mild fleur de sel or pink himalayan

    For the Apricot Kumquat filling
    • 1/2 c dark brown sugar (re: muscovado)
    • 2 T grated orange or lemon zest
    • 1 t cinnamon
    • 4 T All-purpose flour
    • 2 pounds pitted and quartered apricots
    • 1 small handful of kumquats, chopped and seeded *
    • 1/2 C lemon juice
    • 3 T coconut butter, softened and liquidy
    • 1 T water
    • 1/4 c almond extract
    • 2 T amaretto

    *I used what I had! If you like it sharper, use more, if you have sweet lovely apricots with flavor that can stand up on its own, use less.

    Directions: Pre-heat the oven to 350 degrees F. Grease a 9x13 inch glass baking pan OR line it with parchment paper, which creeps all the way up the sides (this will make removing the bars incredibly easy, when they are cooled).

    Put the crumb's dry ingredients into the food processor and pulse a few times, until just mixed. Add the fats, and pulse until loose crumbs form.

    Put aside half a cup of the crumb mixture. Pour the rest of the mix into the prepared pan and flatten it into an even layer. The crust should touch the sides of the pan but should not edge up above. Bake until golden brown, about 12-15 minutes. Transfer to wire rack and cool. Leave the oven on and prepare the apricot filling.

    TEH FILLIN'

    In a medium bowl whisk together the sugar, lemon zest, flour, and cinnamon together. Add the apricots, kumquats, liquids, and fat (re: coconut oil). Gently mix with your hands until everything is evenly coated.

    Spread the mix over the cooled crust. Sprinkle the reserves atop.

    Bake for 35-40 minutes, rotating the pan at 20 minutes. Bake until the top is golden brown and the filling is bubbling around the edges.

    Remove from the oven and let cool on a wire rack. Cut up into squares (or triangles, or diamonds) and serve. This can also be frozen, or kept in an airtight container in the fridge for a couple of days.

    Wednesday, July 8, 2009

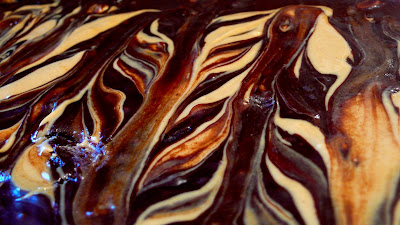
    Peanut Butter Marbled Rocky Road Brownie bars


    Five half pence (two and a half pence?) to the first person who can guess what the above picture is of. No cheating and reading the title before hand!

    Oops, probably too late for that, isn't it? So these are tasty, decadent, rich, happy little things. Like many things the recipe I am posting isn't exactly what I did. So first I will post the recipe I originally intended to go with... And then I will have a discussion about my dance
    with these bars...


    Peanut Butter Marbled Rocky Roads

    • 2 1/4 c vegan graham cracker crumbs
    • 2 T firmly packed dark brown sugar
    • 2/3 c butter sub*
    • 15 oz semisweet chocolate, chopped
    • 1 1/2 light corn syrup
    • 1 c soyatoo cream or cashew cream**
    • 20 halved vegan marshmallows***
    • 1/2 C whole, salted peannuts****
    • 1/2 C to 1 C smooth peanut butter
    Directions:
    Preheat the oven to 300 degrees F. Grease the sides and bottom of a 9x13 inch baking pan.

    In a large bowl, stir together the graham cracker crumbs and brown sugar, then add the butter sub. Stir gently until combined. Pour and evenly distribute into the prepared baking pan, pressing down with your hands along the bottom and up the sides of the pan.

    Bake the crust for 10-15 minutes, or until the crust is golden brown. Remove the plan, let cool on a rack.

    Set up a double boiler. In the large heatproof bowl, toss the chocolate together with the corn syrup. Place over double boiler, add "cream" of choice. Cook, stirring, until everything is melted. Fold in the marshmallows and whole peanuts. Pour the mixture into the pan and spread as evenly as possible (using an off-set spatula helps).

    Now lay down horizontal 'stripes' of peanut butter on the oozy yummy top, then drag a knife up and down vertically to create a marbling effect.

    Refrigerate for at least 3 hours, or until set. Cut into triangles and serve. The bars freeze well, and will keep for about 3 days.

    Asterix!

    So my notes... I hate letting food go to waste, so a few things I did to illustrate alternative uses for things...

    So...
    *Butter sub. I used a mix of canola oil, coconut oil, and about 15% water. There was no need to use more expensive vegan butter for the task at hand.
    ** I used a failed cashew-based raw ice cream with touches of cinnamon and raisen for the cream. It had decent flavor, was good, rich, but didn't quite click right as an ice cream.
    *** I used a failed batch of vegan marshmallows and swirled it in the chocolate mix, rather than getting some vegan marshmallows. I know I've said it before and I'll say it again. I try not to get fairly narrow-use ingredients, especially if they are unnecessarily expensive.
    **** Other nuts are usable. I tossed some yummy walnuts in there!

    Thursday, July 2, 2009

    MALTED CHOCOLATE FUDGE SAUCE (with pastry creme filled banana cakes)


    Baby, this cake is simply a vessel for the lovely unblemished chocolately surface above... Full recipes for everything else will be forthcoming, but right now I am heading off to the woods for the 4th of July.

    This is a conversion of one of many recipes that really doesn't lend itself AT ALL to being vegan (y'know.. Take eggs, cream, butter.. cook, and done! Now, how to make without the eggs, cream, and butter..), so it isn't necessarily that easy to follow.

    Furthermore, I am always trying to fight back the beast that is the house's constantly growing pantry, this means if I am running out of something needed for a recipe I will scour for substitutes or often invent my own (no soy milk? water often works for smaller amounts. Larger amount? Blend some nut butter and water for the quantity needed. Ran out of walnuts? Toast some pecans). In this case, I was supposed to use all light corn syrup, but the bottle was on its last bits, so I substituted dark corn syrup for the rest.

    Then there is finally the content itself.. It is fantastic and addictive, but I feel like I could tone down the malt flavor, in doing so I will probably streamline the recipe next round. For now you are getting the raw notes of my process.

    2/3 c Almond cream (1/6 c TJs raw almond butter, 1/2 c water, blended until consistent)
    1/6 light corn syrup
    1/6 dark corn syrup
    1 T INKA
    2 T dark muscavado sugar
    2 T light brown sugar
    3 T Medium flavor malt powder (available at Brewer's emporiums, teh internets, etc.)
    1/2 t salt (used pink himalayan)
    6 oz bittersweet chocolate, chopped into pieces (Valhrona, used I. arrr!)
    2 T butter sub (in my case I used a home made one consisting of 5 t canola oil, 1 t water, and a dash of lecithin)
    1 t vanilla extract

    Blend all of the ingredients together, up unto the chocolate. Pour into a saucepan with 4 oz of the chocolate over a medium heat. Bring to a boil and stir until smooth. When the chocolate has melted, reduce the heat to maintain a simmer and stirring very slowly, cook for 5 minutes.

    Remove from the heat and stir in the butter sub, vanilla, and the rest of the chocolate.

    Enjoy, no really, it is good. Even the unedited version I wish I